There are several stages to perform thorough penetration testing on android based application including but not limited to Authentication, Authorization, session management, parameter manipulation, to name a few. One of the important steps to perform testing of an android application is intercepting, analyzing and modifying the traffic. In case of plain text (HTTP) traffic, the configuration to intercept the traffic is easy, but for the SSL enabled application, there are few challenges. Here, we shall be discussing about how to intercept HTTP (plain text) & HTTPS (encrypted) traffic through the proxy tools.
Android SDK (in case of Emulator based testing)
A proxy tool (Charles proxy, Burp, etc)
Proxying on emulator is fairly simple technique. If the proxy (such as Burp, Charles proxy, Paros etc.) is configured at 10.1.1.109 on port 8080, then entering the following command into the console will configure a HTTP proxy on the android virtual device (AVD)
# emulator -avd <Your AVD Name> -http-proxy 10.1.1.109:8080
The –http-proxy setting used for the emulator tends to only work for the browser; other applications generally ignore this setting.
In case of SSL traffic proxying, the challenge is to make the Android device/emulator “trust” the SSL certificate issued by proxy. The simple solution would be to install the proxy’s certificate on the device/emulator.
Setting up Proxy for Android < 4.0
Prior to Android version 4.0, the way in which Android handled certificates is different than the latest android OS. To install certificates, perform below mentioned steps:
1. Launch the emulator with read-write permission for system partition
2. Pull out the “cacerts.bks” file from the filesystem located at /system/etc/security/
3. Add the SSL certificate of proxy into it using keytool (keytool is a utility that comes with java sdk and jre)
4. Push the updated “cacerts.bks” file back onto the device in the same folder
5. Make it persistent (so this works when the AVD reboots)
Adding Certificate
The procedure is same for all proxy tools.
1. To start the AVD, open the command prompt/terminal and navigate to android sdk. Go to tools directory and run ‘emulator’ executable with “-partition-size 128” argument. This argument instructs the AVD to mount “/system” partition with read-write permission, which is not possible with remounting it.
# emulator –avd <avd name> -partition-size 128
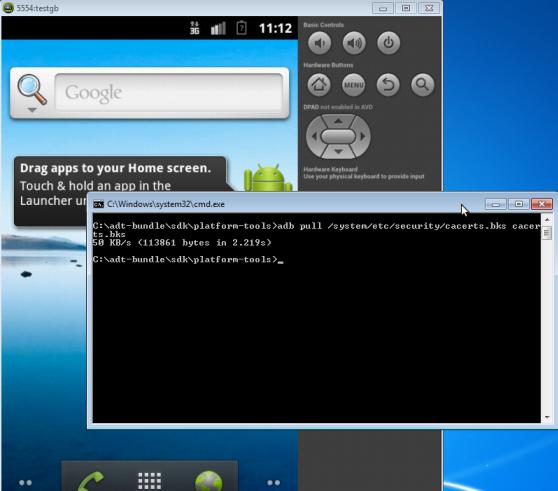
2. Next, to pull cacerts.bks file from the emulator:
# adb pull /system/etc/security/cacerts.bks cacerts.bks
3. Now, to add the certificate of the proxy tools into the “cacerts.bks” file, pulled from the device:
# keytool -keystore cacerts.bks -storetype BKS -provider org.bouncycastle.jce.provider.BouncyCastleProvider -storepass changeit -importcert -trustcacerts -alias somealias -file <your_proxy_certificate.crt> -noprompt
Obtain Charles proxy’s certificate from http://charlesproxy.com/charles.crt or for any other proxy, we can export the certificate by configuring proxy on the web browser on laptop/desktop.
Alternatively, we can use Portecle. Portecle is a user friendly GUI application for creating, managing and examining keystores, keys, certificates, certificate requests, certificate revocation lists and more.
Note: On the Mac, we may get an error about keytool not being able to find bouncycastle, which can be fixed by getting the latest provider from here and putting it in $JAVA_HOME/jre/lib/ext/. (On the Mac OSX Mountain Lion, the path is “/System/Library/Frameworks/JavaVM.framework/Home/lib/ext/”)
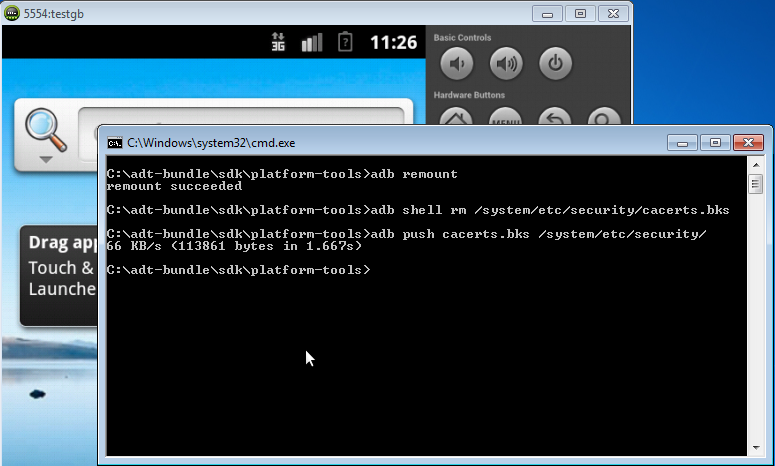
4. Now push the “cacerts.bks” file back to the device/emulator using adb
# adb remount
# adb shell rm /system/etc/security/cacerts.bks
# adb push cacerts.bks /system/etc/security/
5.
6. To push the mkfs.yaffs2.arm tool to our android instance.
# adb push mkfs.yaffs2.arm /data/data/temp/mkfs.yaffs2
# adb shell chmod 777 /data/data/temp/mkfs.yaffs2
7. We will now make new system.img on sdcard
# adb shell
# /data/data/temp/mkfs.yaffs2 /system /sdcard/system.img
8. Quit the shell and download the newly generated system.img.
# adb pull /sdcard/system.img system.img
9. Close the emulator and boot the new system.img. Paste the new system.img in “path/to/.android/avd/<avdname>.avd/”
10. Boot your avd
# emulator -avd <avd name> -http-proxy <ip:port>
11. In case of actual rooted device, steps 5 to 10 will be skipped
Configure Charles proxy for SSL Proxying from here : http://www.charlesproxy.com/documentation/proxying/ssl-proxying/
Proxying Application traffic changed significantly after Android 4.0 (Ice Cream Sandwich or “ICS”) was released.
Contrary to iOS, Android < 4.0 had no setting for proxying traffic.
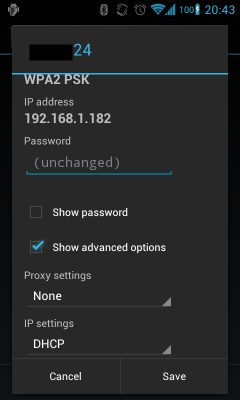
Android 4.0 (ICS) Proxying could be done by long press on the currently-connected Wi-Fi network and then a check box for advanced options as seen below.
Even with this, Proxying application SSL traffic is not possible.
There are multiple solutions to this problem, one of them being installation of “ProxyDroid” app directly on a rooted ICS phone. This allows an analyst to easily forward all traffic from the real application through a proxy; the only problem becomes SSL certificates, since the proxy will need to use its own SSL certificate, which Android will not recognize as valid.
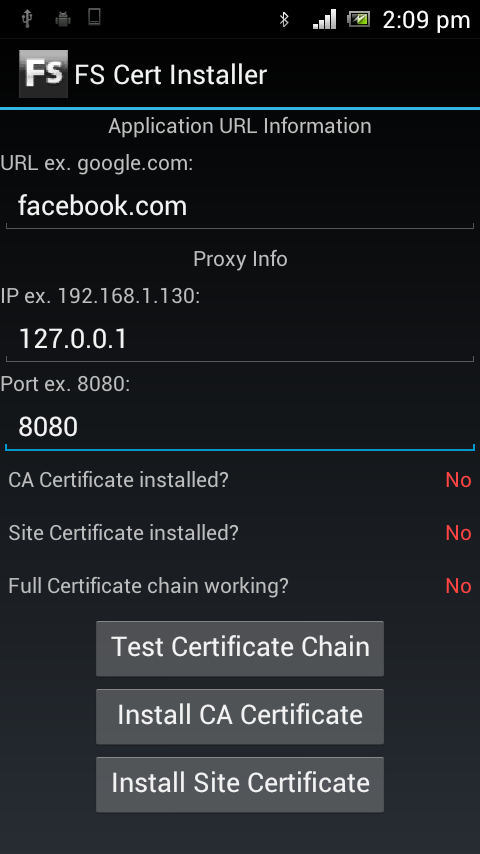
Next step would be to install FS CERT Installer app.
FS CERT Installer is an Android app by Foundstone used to install CA and site certificate when proxying Android applications.
1. Install the FS Cert Installer (Download:FS CERT Installer)
2. Push the certificates into the device sdcard:
# adb push PortSwiggerCA.cer /sdcard/
3. Change the certificate on Burp to generate a certificate with a specific hostname.
4. Install certificate by Settings -> Security -> Install from SD card.
5. Open Proxy and set intercept to off
6. Launch FS Cert Installer and test the certificate installations
7. Test Proxying of the target application.
After the process is complete, we are all set to start intercepting app SSL traffic on Android ICS.
Introduction In the era of digitalization, data security has become a paramount concern. Every day,…
I.Introduction Bluetooth has become an integral technology for billions of smartphones, computers, wearables, and other…
I. Introduction In today's ever-evolving cybersecurity landscape, staying ahead of adversaries has become a challenge.…
Introduction In an increasingly interconnected world, the financial industry is becoming more vulnerable to cyber…
Introduction In today's interconnected world, where smartphones are an extension of our lives, ensuring the…
Introduction Unseen and unpredictable, zero-day threats loom as a constant menace to modern businesses. Detecting…
View Comments
But i cant intercept Facebook app traffic, please tell a way to do this. Please